
分类: Linux

  • oh-my-zsh终端用户名显示不正常及主题修改

    oh-my-zsh终端用户名显示不正常及主题修改

    不知道是改了什么还是一开始就这样,ssh登录后,终端不显示类似root@itgeeker的前缀了。如果输入bash切换到系统默认的有显示正常了,应该是zsh的配置问题。

    echo $PS1
    echo $PROMPT
    # 这两条显示你bash的配置profile,可能内容类似:
    ${ret_status} %{$fg[cyan]%}%c%{$reset_color%} $(git_prompt_info)
    
    echo $ZSH_THEME
    #查看当前主题
    robbyrussell
    
    #切换到oh-my-zsh主题目录
    cd ~/.oh-my-zsh/themes
    vi robbyrussell.zsh-theme

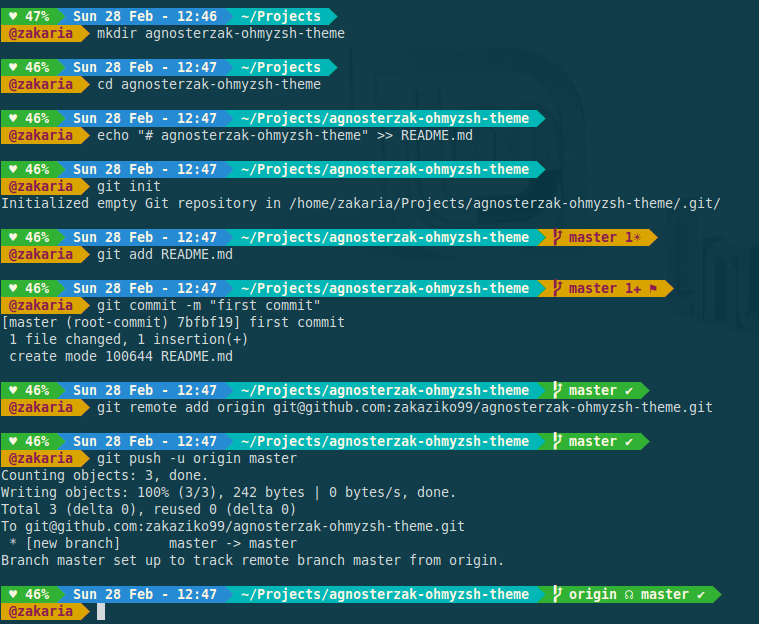
    然后可以修改主题设置,但这个比较复杂,最简单的方法,换个其他主题吧,比如:agnoster

    vi  ~/.zshrc
    ZSH_THEME="agnoster"
    source ~/.zshrc

    当然也可以换成其他主题,官方参考网页:https://github.com/robbyrussell/oh-my-zsh/wiki/External-themes

    由于oh_my_zsh时常会有版本更新,为了避免我们修改的跟更新的版本有冲突或被覆盖,建议不要直接修改原始主题,而是将复制一份,重命名为自己的主题文件,比如叫做itgeeker.zsh-theme,然后对itgeeker.zsh-theme进行修改定制。 

    参考文章:https://blog.csdn.net/z3512498/article/details/51245853

  • 阿里云经典网络升级为专有网络

    阿里云经典网络升级为专有网络

    记得今年上半年,为了复制老服务器(经典网络)的文件到新服务器(专有网络),寻求阿里云的技术支持,结果什么解决方案都给不出,答复说我原先所在的服务器基础设施过于陈旧,所以无法通过内网复制,ITGeeker技术奇客只能通过外网,花了一天一夜才复制完毕。幸亏数据量不大,由此对阿里云的服务器十足的失望了一把。

    上周开始,阿里云突然提示说可以把经典网络升级成专有网络了,猜想阿里云对老用户的抱怨应该有所察觉,不能不管已卖掉的老服务器吧。

    于是乎赶紧升级了名下唯一的还是经典网络的服务器,过程非常顺利,递交申请后很快就回复,然后就给顺利的升级了。当然升级时有些提示,具体情况还是要根据自己的实际配置来调整配置服务器。

    ITGeeker技术奇客升级到专有网络碰到的几个问题:

    • SSH设置了hosts.allow,但是无论如何设置还是无法登录,提示connection refused的错误,最后只能vi /etc/hosts.allow,注释其他所有,添加以下代码解决。
    ssh: ALL
    • 服务器装有LDAP服务,阿里云升级到专有网络后,本地的ip地址也更改了,所以还要修改hosts文件,把老的内网ip替换为新的内网ip,否则你的ldap可能会提示错误。
    Starting ldap...Done. Failed. Failed to start slapd. Attempting debug start to determine error. 5c16fedd daemon: bind(7) failed errno=99 (Cannot assign requested address) 5c16fedd daemon: bind(7) failed errno=99 (Cannot assign requested address) 5c16fedd slap_open_listener: failed on ldap
    • 再有就是要创建一个专有网络的安全规则,和之前的经典网络安全规则不通用。正好可以清理一下之前不必要的port通行,顺便也看看iptables吧,如果你还是使用CentOs 6 版本的防火墙。
  • CentOS 7 x64如何安装内网穿透工具frps服务器端

    首先:下载最新版frp文件

    官方地址:https://github.com/fatedier/frp/releases

    wget https://github.com/fatedier/frp/releases/download/v0.18.0/frp_0.19.1_linux_amd64.tar.gz
    tar -zxvf frp_0.19.1_linux_amd64.tar.gz
    cd frp_0.19.1_linux_amd64

    可以删除掉不必要的客户端文件,只是为了更加简洁而已。

    rm -f frpc frpc_full.ini frpc.ini

    frpc 为客户端文件
    frps 为服务器端文件

    然后配置服务器端文件

    vi frps.ini

    #注意这些port端口号要与客户端frpc的配置文件对应起来

    [common]
    bind_port = 7777
    vhost_http_port = 8888
    dashboard_port = 9999
    dashboard_user = itgeeker
    dashboard_pwd = itgeeker
    max_pool_count = 5
    authentication_timeout = 900
    
    subdomain_host = itgeeker.net
    
    # console or real logFile path like ./frpc.log
    log_file = ./frps.log
    # debug, info, warn, error
    log_level = info
    log_max_days = 3
    
    [ssh]
    listen_port = 8000
    auth_token = itgeekerfrps
    

    详细配置https://github.com/fatedier/frp/blob/master/README_zh.md

    # 保存上面配置文件吗,启动 frp 服务器

    ./frps -c ./frps.ini
    #带log输出
    ./frps -c ./frps.ini -L logs &

    服务端配置结束。若需要后台运行,请看下面“”

    添加开机启动frp服务端 for centos

    方法一:放rc.local里

    chmod +x /etc/rc.d/rc.local && vi /etc/rc.d/rc.local
    #把下面的内容粘贴到文件末尾
    /opt/frp/frps -c /opt/frp/frps.ini

    方法二:Centos 7 Systemd 管理

    $ sudo cp frps /usr/local/bin/frps
    $ sudo mkdir /etc/frp
    $ sudo cp frps.ini /etc/frp/frps.ini
    

    编写 FRP SERVICE 文件,以 CENTOS7 为例
    $ sudo vi /usr/lib/systemd/system/frps.service

    [Unit]
    Description=frps
    After=network.target
    
    [Service]
    TimeoutStartSec=30
    ExecStart=/usr/local/bin/frps -c /etc/frp/frps.ini
    ExecStop=/bin/kill $MAINPID
    
    [Install]
    WantedBy=multi-user.target

    # 启动 FRP 并设置开机启动

    $ sudo systemctl start frps
    $ sudo systemctl enable frps
    $ sudo systemctl status frps

    frps升级

    1. 下载最新版frp文件,
    2. 停止frps服务

    systemctl stop frps

    3. 用新版本覆盖旧版本
    4. 如果使用systemd的,记得覆盖:

    cp frps /usr/local/bin/

    5. 启动新版本frps

    systemctl start frps
  • CentOS 7使用yum安装abiword的正确姿势

    首先选择源码编译安装,碰到几个问题及解决方案

    wget https://www.abisource.com/downloads/abiword/3.0.2/source/abiword-3.0.2.tar.gz
    tar zxvf abiword-3.0.2.tar.gz
    cd abiword-3.0.2
    ./configure --enable-plugins="command" --with-gtk2
    # error1
    configure: error: `png.h’ not found, install libpng or specify CPPFLAGS to include custom locations
    解决方案:yum install libpng-devel
    # error2
    configure: error: jpeg.h not found
    解决方案:yum install libjpeg-devel
    # error3
    configure: error: `boost’ not found.
    解决方案:yum install boost-devel
    编译结果error:
    No package ‘fribidi’ found
    No package ‘glib-2.0’ found
    No package ‘gthread-2.0’ found
    No package ‘gobject-2.0’ found
    No package ‘libgsf-1’ found
    No package ‘wv-1.0’ found
    No package ‘libxslt’ found
    No package ‘cairo-pdf’ found
    No package ‘cairo-ps’ found
    No package ‘pangocairo’ found
    No package ‘gtk+-2.0’ found
    No package ‘gtk+-unix-print-2.0’ found
    No package ‘librsvg-2.0’ found
    No package ‘x11’ found
    解决方案:yum install fribidi glib libgsf libxslt gtk+
    但仍然有很多模块没有,需要一个一个找解决方案,觉得太花时间,果断选择yum安装,结果大部分源都没有abiword这个package。

    yum安装abiword之歪路,使用ELRepo源未果

    一开始查到网上说ELRepo源有abiword,于是找到官方
    Import the public key:
    rpm --import https://www.elrepo.org/RPM-GPG-KEY-elrepo.org
    To install ELRepo for RHEL-7, SL-7 or CentOS-7:
    rpm -Uvh http://www.elrepo.org/elrepo-release-7.0-3.el7.elrepo.noarch.rpm
    结果没有找到abiword,后来看说明是说要
    rpm -Uvh elrepo-release*rpm
    可能还需要导入elrepo-kernel elrepo-extras elrepo-testing,后来ITGeeker技术奇客转用lux源解决了,所以没有尝试这三个源。

    CentOS 7使用yum安装abiword的正确姿势

    rpm -Uvh http://repo.iotti.biz/CentOS/7/noarch/lux-release-7-1.noarch.rpm
    yum install abiword
    找对方法了,其实很简单。
     # which abiword
     /usr/bin/abiword
     # abiword --plugin=AbiCommand
     AbiWord command line plugin: Type "quit" to exit
     AbiWord:>
  • CentOS6.5 64bit如何安装DNS服务dnsmasq加速网站访问

    dnsmasq是个非常小巧的dns服务器,可以解决小范围的dns查询问题,建议内网终端不要超过50台主机为佳。刚刚调整了一下内容,重新发布此文章。
    Dnsmasq_icon.svg

    Dnsmasq是一个很实用的小工具,解决局域网的需求看来非常合适,特别是网关和防火墙上。ITGeeker建议可以使用它来:

    1. 优先使用本地自定义dns和host,可以针对不同的网站使用不同的DNS,以提高网页打开速度。
    2. 提供dhcp服务,方便内网主机和移动设备管理。

    1. YUM安装方法

    非常方便,但版本比较低,目前只能安装dnsmasq x86_64 2.48-13.el6,但官方最新版已到2.71

    yum install dnsmasq

    2. 编译安装dnsmasq

    cd /tmp && wget http://www.thekelleys.org.uk/dnsmasq/dnsmasq-2.71.tar.gz 
    tar -zxvf dnsmasq-2.71.tar.gz && cd dnsmasq-2.71
    make install
    #也很容易,安装完成
    
    cp dnsmasq.conf.example /etc/dnsmasq.conf
    mkdir -p /etc/dnsmasq.d   #这个目录备用

    3. dnsmasq配置

    主要有三个文件:

    /etc/dnsmasq.conf
    /etc/dnsmasq.d/resolv.dnsmasq.conf
    /etc/dnsmasq.d/dnsmasq.hosts

    第一个是系统默认必须的,后面两个可以自行建立,放置的路径也可以根据自己需要定义。

    vi /etc/dnsmasq.conf

    自带的配置文件有很多说明,可以直接在上部加入以下内容,保留之前的可以当帮助文件用,也可直接删除原先的内容。

    #ITGeeker每次开启都提示错误,目的是让dnsmasq读取目录内所有配置文件
    #conf-dir=/etc/dnsmasq.d
    
    #让dnsmasq读取你设定的resolv-file
    #no-resolv
    resolv-file=/etc/dnsmasq.d/resolv.dnsmasq.conf
    
    no-poll
    strict-order
    
    #不读取系统hosts,读取你设定的
    no-hosts
    addn-hosts=/etc/dnsmasq.d/dnsmasq.hosts
    
    #dnsmasq日志设置
    log-queries
    log-facility=/var/log/dnsmasq.log
    
    #dnsmasq缓存设置
    cache-size=1024
    
    #单设置127只为本机使用,加入本机IP为内部全网使用
    listen-address=127.0.0.1,192.168.188.199

    在/etc/dnsmasq.d目录下新建2个文件

    vi /etc/dnsmasq.d/resolv.dnsmasq.conf

    国内快的DNS也就这些了,谷歌的8.8.8.8这两天有点慢,甚至ping不同,可能和香港和越南的光纤断裂有关,所以暂时注销了。

    #nameserver 127.0.0.1   不应该添加
    nameserver 202.96.209.5
    nameserver 202.96.209.133
    nameserver 223.5.5.5
    nameserver 223.6.6.6
    nameserver 114.114.114.114
    nameserver 8.8.4.4
    #nameserver 8.8.8.8

    vi /etc/dnsmasq.d/dnsmasq.hosts

    给出以下样本,ITGeeker建议自己制作一个最新好用的。

    173.194.120.88   0.docs.google.com
    216.239.32.39    0.docs.google.com
    173.194.120.88   0.drive.google.com
    216.239.32.39    0.drive.google.com
    ......

    dnsmasq启动脚本

    编译安装比较麻烦的就是这件事了,当然也可直接手动操作:

    启动: /usr/local/sbin/dnsmasq
    验证:netstat -tunlp|grep 53
    关闭:killall -KILL dnsmasq
    重启: pkill -9 dnsmasp && /usr/local/sbin/dnsmasq -h

    还是编辑一个启动脚本吧

    vi /etc/init.d/dnsmasq


    #!/bin/sh
    #
    # Startup script for the DNS caching server
    #
    # chkconfig: - 49 50
    # description: This script starts your DNS caching server
    # processname: dnsmasq
    # pidfile: /var/run/dnsmasq
    
    # Source function library.
    . /etc/rc.d/init.d/functions
    
    # Source networking configuration.
    . /etc/sysconfig/network
    
    # Check that networking is up.
    [ ${NETWORKING} = "no" ] && exit 0
    
    dnsmasq=/usr/local/sbin/dnsmasq
    [ -f $dnsmasq ] || exit 0
    RETVAL=0
    
    # See how we were called.
    case "$1" in
      start)
            if [ $UID -ne 0 ] ; then
                echo "User has insufficient privilege."
                exit 4
            fi
            echo -n "Starting dnsmasq: "
            daemon $dnsmasq $OPTIONS
            RETVAL=$?
            echo
            [ $RETVAL -eq 0 ] && touch /var/lock/subsys/dnsmasq
            ;;
      stop)
            if test "x`pidof dnsmasq`" != x; then
                echo -n "Shutting down dnsmasq: "
                killproc dnsmasq
            fi
            RETVAL=$?
            echo
            [ $RETVAL -eq 0 ] && rm -f /var/lock/subsys/dnsmasq /var/run/dnsmasq.pid
            ;;
      status)
            status dnsmasq
            RETVAL=$?
            ;;
      reload)
            echo -n "Reloading dnsmasq: "
            killproc dnsmasq -HUP
            RETVAL=$?
            echo
            ;;
      force-reload)
            # new configuration takes effect only after restart
            $0 stop
            $0 start
            RETVAL=$?
            ;;
      restart)
            $0 stop
            $0 start
            RETVAL=$?
            ;;
      condrestart)
                if test "x`/sbin/pidof dnsmasq`" != x; then
                    $0 stop
                    $0 start
                    RETVAL=$?
                fi
                ;;
      *)
            echo "Usage: $0 {start|stop|restart|reload|condrestart|status}"
            exit 2
    esac
    
    exit $RETVAL
    

    Tips:如果你是本地编辑上传的,提示找不到文件记得

    set ff=unix

    再赋予执行的权限

    chmod +x /etc/init.d/dnsmasq

    现在可以启动和设置自动启动了

    service dnsmasq restart
    chkconfig dnsmasq on

    验证是否正确启动

    netstat -tunlp|grep 53

    验证是否正确工作

    需要命令dig和nslookup,如果没有,安装一下

    yum install bind-utils

    记得在iptables防火墙开放53端口,tcp和udp都要开

    vi /etc/sysconfig/iptables

    -A INPUT -p udp -m state --state NEW --dport 53 -j ACCEPT
    -A INPUT -p tcp -m state --state NEW --dport 53 -j ACCEPT

    将其他机器的DNS换成dnsmasq所在服务器的IP,这是关键,否则没人使用你的DNS服务。

    利用dig或者nslookup参看DNS Server是否是

    127.0.0.1或者192.168.188.199

    大功告成!!!

    /etc/dnsmasq.conf中dns和address配置范例

    如果你想使用dnsmasq的泛解析功能,ITGeeker这里提供一些范例供你参考。

    设定某些网址使用国内的DNS服务器,这里选用了上海最快的上海电信服务器,你也可以选择适合你的最快DNS服务器地址。

    #Specify DNS server China
    server=/www.freegeeker.com.cn/202.96.209.5
    server=/itgeeker.net/202.96.209.5
    server=/geekerconsulting.com/202.96.209.5
    server=/baidu.com/202.96.209.5
    server=/cn/202.96.209.5
    server=/taobao.com/202.96.209.5
    server=/weibo.com/202.96.209.5
    server=/weibo.cn/202.96.209.5
    server=/xunlei.com/202.96.209.5
    
    #Specify DNS server out of china
    server=/google.com/8.8.4.4
    server=/twitter.com/8.8.4.4
    server=/facebook.com/8.8.4.4

    dnsmasq广受好评的泛解析,可以设定局域网内的特殊网址解析,禁止的ip解析等

    #local itgeeker
    address=/local.itgeeker.com/192.168.188.199
    
    #forbid ip list
    #1. video play website
    address=/.youku.com/192.168.188.199
    address=/.tudou.com/192.168.188.199
    address=/video.sina.com.cn/192.168.188.199
    address=/.ku6.com/192.168.188.199
    address=/.funshion.com/192.168.188.199
    address=/video.sina.com.cn/192.168.188.199
    address=/video.sina.com.cn/192.168.188.199
    address=/.youku.com/192.168.188.199
    address=/.tudou.com/192.168.188.199
    
  • CentOS 7 64bit如何安装php soap模块

    错误提示:
    Your server does not have the SOAP Client class enabled – some gateway plugins which use SOAP may not work as expected.
    查看soap模块是否安装的办法:在php的安装目录下运行php -m来查看
    /usr/bin/php -m |grep 'sosap'

    如果没有安装,则进入php的安装源文件夹

    cd /tmp && tar zxvf php-5.4.16.tar.gz && cd php-5.4.16/ext/soap

    此处自己去php官方下载相应的版本。

    进入后运行phpize命令
    /usr/bin/phpize

    碰到错误提示,安装两个依赖包解决

    # /usr/bin/phpize
    Can’t find PHP headers in /usr/include/php
    The php-devel package is required for use of this command.
    yum install php-pear
    yum install php-devel

    查看信息是否有还有错误,没有出错的话运行如下命令:

    ./configure –-with-php-config=/usr/local/php/bin/php-config –enable-soap
    ./configure --with-php-config=/usr/bin/php-config --enable-soap

    然后是安装编译

    make
    最后是安装
    make install
    安装好之后会提示soap.so文件的保存路径
    # make install
    Installing shared extensions:     /usr/lib64/php/modules/
    接着修改php.ini文件
    vi /etc/php.ini
    查找/etc/php.ini中的extension_dir = “./”,默认是注释掉的
    修改为

    extension_dir = "/usr/lib64/php/modules/"

    并在此行后增加如下,然后保存:

    extension = "soap.so"

    执行php-fpm看看有没有错误

    没有php-fpm,安装一个吧
    yum install -y php-fpm
    重新启动apache:
    systemctl restart php-fpm
    再运行php -m就已经能看到扩展的soap模块了。
奇客罗方公众号 奇客罗方小程序 奇客罗方客服 ITGeeker Telegram

网站由ITGeeker技术奇客开发并管理;隶属于GeekerCloud奇客罗方智能科技
Site designed and developed by ITGeekerwhich is a sub-website of GeekerCloud
网站地图 | 沪ICP备2021031434号-4